Renovation: The Master Bath
- Kimberly Wyse
- Sep 28, 2022
- 5 min read

Updated: Jul 13, 2024
One of the things that most surprised me when I toured this house for the first time was the master bathroom. I knew that the house was a fixer upper, but it was hard to even estimate the cost of updating this room to reflect the style and size of this house. A previous owner had painted it and updated some of the fixtures, but it needed structural reconfiguration and repair.
It had a very small stall shower, one sink in a long, low cabinet, a huge closet, and water damage. The leak had been repaired, but the damage had not.
My guess is that the flooring was original to the home. But as I talked to my contractor, I got very excited about the possibilities. There were several ways that I could add space to the room and reconfigure the space to work better.
This is the last post in my blog series on my latest home renovation. To read more, start here.
Here are some BEFORE photos. This paint color was chosen during a time when darker paint was very popular. The space to the left of the shower was the back of a closet in the master bedroom. The stall shower was extremely small and in poor condition. The cabinet doors above the toilet didn't close.
Although it's not pictured well here, the flooring around the toilet was discolored/stained from the water leak. There was also a walk-in closet beside the vanity, making the closets in the main bedroom suite total NINE.


IN PROGRESS: Looking from the (now) laundry room into the bathroom, we removed the closet (that had double accordion doors) to the right. We closed in the wall and added the additional space to the bathroom.

We completely removed the shower and toilet, as well as the cabinet. That's when we discovered a hole in the subfloor from the water leak.
Below, the space to the right of the window was one of the four walk-in closets in main bedroom. We made that closet significantly smaller to add the extra space to the bathroom.

We reframed much of the room, adding a pony wall between the new vanity and toilet area.

The extra space we made from the closet from the main bedroom allows for a large bathtub.

The new shower was placed in the area where the closet and toilet had previously been. It is four feet square. The hall closet wall is not totally closed off yet in the photo below.

We removed the vanity and added the half wall. We ran new electrical and added plumbing for a second sink. We also removed the closet that was beside the vanity.

New drywall makes a huge difference in seeing the updated layout.

The ceiling had been prepped for the new light fixture over the bathtub.

Special drywall was used because the area would often be wet. The shower was set up to make it easy to install a Schluter shower system.

Because of the new electrical and plumbing, new drywall had to be installed behind the vanity area.

AFTER! This bathroom wasn't completed until we'd been in the house for several months, so it was pretty exciting when it was finished.
The new shower is one of my favorite places in the house! Here are some photos, and I'll write about details further down.


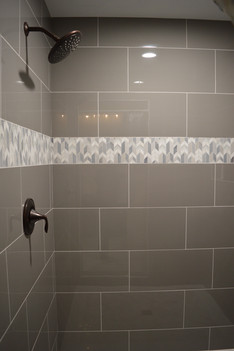


We decided on a raindrop glass door that swings in and out with the minimum space allowed for air flow. This allows the shower to steam up nicely, although it isn't technically a steam shower, which requires special ventilation.
In the shower, the wall is large, polished porcelain tile in metropolis dark gray with light gray gout. The floor (my favorite) is an arabesque, white and gray, polished Carrara tile with an eight inch white subway tile frame. That tile I repeated in the wall niche. Please note, for the sanity of your tile installer, the floor design is not easy to install. I should have found my tile installer first, then had him help me decide on tile. The tile was installed by an excellent local tile contractor.
The accent ribbon in the shower is a white and gray mosaic marble tile. I love the design because it looks like arrows pointing up. If you're a part of the T21 family, you'll understand why this is significant for me. The accent ribbon is set off by a thin, pencil frame border. We chose to do a large, rain head shower head in oil rubbed bronze (Eva) from Moen Pro.
My new bathtub is just as wonderful as I imagined! The front of the bathtub matches the new vanity, the backsplash is the same as the shower accent ribbon. The tile border matches the frame around the outside of the shower. The ledge around the bathtub is the same large, polished metropolis gray of the shower walls.


The new floor is a Luxury Vinyl Tile in white and gray, which flows smoothly into the adjacent laundry room. The custom vanity is from Heartwood Cabinetry. We used gold-tone drawer and cabinet pulls like in the kitchen.
We used the same tile for the backsplash as around the tub and in the shower, also with a pencil border. It's hard to see from the photos, but the light sconces are round with bubble glass, which adds a pretty texture.
The counters and wall cap are a polished off-white Quartz with subtle gray veining. The gray cylinder beside the half-wall is a towel warmer! It's so cozy to have a warm towel waiting for you when you get out of the tub/shower.


The walls are painted Edgecomb Gray to match the laundry and sitting rooms. The border on the mirrors is beige and gray to compliment the walls and tile. We put a fresh coat of white paint on the door and trim.

The bathroom transformation is almost as big as the kitchen. Now it matches the size and scale of the rest of the house. And with that, I am done with my series on this house renovation!
I feel like it will be a while before I tackle another project like this, but you never know. If the right opportunity comes up, we may start something else. But for now, I'm breathing a big, satisfied sigh of relief and trying to enjoy this house that God has so richly blessed us with.
I have loved dreaming up all the ways we could transform it, then seeing the progress to completion. There were days when I thought I might have a stroke from the stress of figuring it all out, but now it all seems worth it. My prayer is that our home can be a place where we bring glory to God.

Click on this picture to save this post to Pinterest!


