Renovation: Kitchen
- Kimberly Wyse
- Apr 20, 2022
- 9 min read

Updated: Jul 12, 2024
Welcome to the first post in my new blog series on our home renovation! Join me as we tour through before and after photos. Since this post is the first one, I'll start with a little background.
This house is my third renovation. With the first, I was mainly the designer. We lived there for 10 years and worked on it a little at a time. The second one was purely a flip that I did with a partner. This house is an investment property, but we are also living here for a while. I started doing this because I've always been interested in home renovation and design, and at this stage in my life, it's possible. It's also stressful, but I love the outcome so much that it's worth it.

This house is a 3600-square-foot, Georgian/Colonial-style brick house with four bedrooms, 2.5 bathrooms, a partially finished basement, two fireplaces, and a beautifully-landscaped yard. But the kitchen was only 10' x 12' and entirely enclosed. It had beautiful cherry wood cabinets and had been nicely updated at some point, but the colors were dark (which was very popular at the time). It was much too small by today's standards, especially for such a grand house. Right beside the kitchen was a large and bright laundry room with more cabinets and closets, plus an exterior door. On the other side of that space was a den with a wide, brick fireplace and French doors leading to a screened-in porch.


I got out my measuring tape, graph paper, pencil, and eraser and started planning. I wanted to open up the space as much as possible to give it a cozy, heart-of-the-home feeling. I envisioned my children doing their homework in there while I made dinner, sitting at the island to talk to me while they ate snacks, and watching movies together as a family. I wanted to be able to look out at the back and front of the house to watch where they were playing. I also wanted a kitchen that would be a pleasure to cook in with a large pantry, double ovens, and a eye-catching hood vent over the stove.
BEFORE: Before the renovation, if you came in from the side nearest the driveway, you were immediately in the laundry room. Solid wood doors and cast iron heaters spoke of a different time and the quality put into everything built here. This view is what you would've walked into - two closets on one side and the washer/dryer on the other.

Beyond that, there was a second kitchen sink, black laminate counters, more cabinetry, and a large window.

On the other side of this wall, behind the cabinets, was the kitchen. One thing we were able to save and reuse was the black cast-iron cabinet handles, which you can see in the updated kitchen.


Moving on to the kitchen, this was the entrance into the den. The white door is to a long hallway that separates the dining room from the office. The two doors into the kitchen were matching cherry wood. The one on the left opened into the den (beside the fireplace) and the one on the right opened into the dining room. This photo was taken after we re-did the dining room walls. They had been dark red.
There was wallpaper on the ceiling, along with some water damage from a plumbing leak. The leak had been fixed, but the damage had not been repaired.


The countertops were cement with a tile backsplash. I really liked that apron sink, but we couldn't save it. Taking out the cement counters was a challenge and caused a lot of damage.

We considered keeping the cabinets, but the configuration didn't work, so we were able to pass them on to a family building something new, which could build to their specifications.

After these two main walls were torn out, the kitchen, laundry area, and den were all open. The cabinets and closet from the laundry room were also removed. We moved this nice refrigerator to the garage and I love having it for extra storage. (If you look closely here, you can see the custom blue and gold cookies we were gifted to help celebrate closing on this house.)
IN PROGRESS: In the next photo, you can see what it looked like after demo. The framing was already in for the pantry. It took a special tool to get the layers of flooring up, and then we discovered water damage that required a new subfloor. (THEN we found out that the type of flooring we ordered required a different kind of subfloor, so that was fun...) Some years back, there had been a water leak in the upstairs bathroom. It caused damage to the bathroom floor, floor joists, and kitchen ceiling too.
What you can't see here is how we discovered that the wall between the kitchen and laundry room contained all the plumbing for the kitchen. It had to be moved and you can see the new drywall around the window where we rerouted the pipes. (I use the word "we" here loosely. It was the plumber who actually did the work. We have exactly zero plumbing skills.)

You can see how open that made it. We ended up tearing out the entire ceiling to repair the water damage and reroute the plumbing. We also replaced a rotting floor joist and added some extra support. We had to extend the huge support beam between the kitchen and den so we could remove the two posts on the left.

Spaced opened up, beam installed, and new drywall! (The hole in the ceiling remained for a while because supply delays hit, so we just had to wait for some plumbing materials.) Looking into the dining room, you can see that we removed the door into the dining room too. We considered opening it up further, but the open concept and large windows really limited our wall space for cabinets, so we left it as it was.


The first coat of primer really changed the look of the space! This is where the cubbies would eventually go and where we removed the two closets beside the exterior door.

When the cabinets were finally installed and the water/electrical hooked up, I knew we could move in. That was a good day! I chose navy cabinets for the bottom and cream-colored cabinets for the top and around the refrigerator. It took a few more weeks to get the navy hood vent in due to manufacturer delays. I also found a new apron sink to replace the one that was damaged. At this point, the den hadn't been painted. See the dark brown wall to the right?

I had so much fun shopping for countertops for these cabinets. Working with a local contractor, I went to a huge warehouse full of slabs and walked around for a long time, comparing prices and designs. I didn't have a strong desire for one material over another, as long as it was a solid surface. Because we have color in our cabinets, I decided on a simple white polished Quartz with light gray veining for the perimeter counters. For the island, I chose the design that made me the happiest. It's a brushed Quartzite (natural stone) with a lot of movement. I stood and stared at it for quite a while, trying to picture it on my island, and finally decided to go for it. I was worried it would be too much, but once it was installed, I was very happy with my choice. In this photo, the window frames hadn't yet been painted and we were still awaiting one last piece of trim.

AFTER! These photos show the finished kitchen, including the closed up ceiling, navy hood vent, floating shelves, lights, trim, counters, and plantation shutters!

I love the gold light fixtures and cabinet handles. The floor is a luxury vinyl pattern that was inspired by the barber shop at the 1920's Main Street at Sauder Village in Archbold, Ohio. I chose vinyl to reduce costs and because I was tired of everything breaking when it hit the tile floor at the farm house. This floor feels really good under my feet, especially when I have to stand for long periods of time. It also makes me so happy every time I look at it. I love the pattern and the subtle colors.
I found the floating shelves on etsy.com at DIYdadDesign. I was able to order them to my exact specifications - length, color, etc. They arrived more quickly than expected and with everything I needed to hang them.

Since there's a pattern on the floor, I thought a simple backsplash design would be better. The backsplash I chose is a 4x12 polished subway tile with a frame. Under the hood vent, I found a mosaic, herringbone tile in white and gray with a gray limestone pencil trim.

We have stainless-steel appliances, and decided on a glass-top stove for safety reasons. The controls are much more difficult for little hands to reach and we won't have to worry about gas leaks. The antique coffee grinder mounted on the wall to the right was a gift from my father-in-law and we use it often. Freshly ground beans make the best coffee!

The wall color is a custom color through Benjamin Moore, called Silver Shadow (borrowed from Behr). The trim is Benjamin Moore Elephant Tusk. The navy throughout the house is Benjamin Moore Newburyport Blue, which matches the navy cabinets.

The most exciting part for me is the cubbies! I designed them to help us contain all the papers and shoes and bags and treasures that tend to pile up all over the house otherwise. They were custom-built through our general contractor: Graber Custom Renovations. Painted to match the cabinets, we also stained the bench to match the floating shelves.
The baskets on the bottom (from At Home) are for shoes. Coats and backpacks hang in the larger section, and school papers go in the mail slots. Anything that the kids leave laying around (after repeated attempts to get them to put their stuff away) goes into the navy baskets (from Amazon) at the top. Can't find what you're looking for? Check your basket! (Ahhhh....)
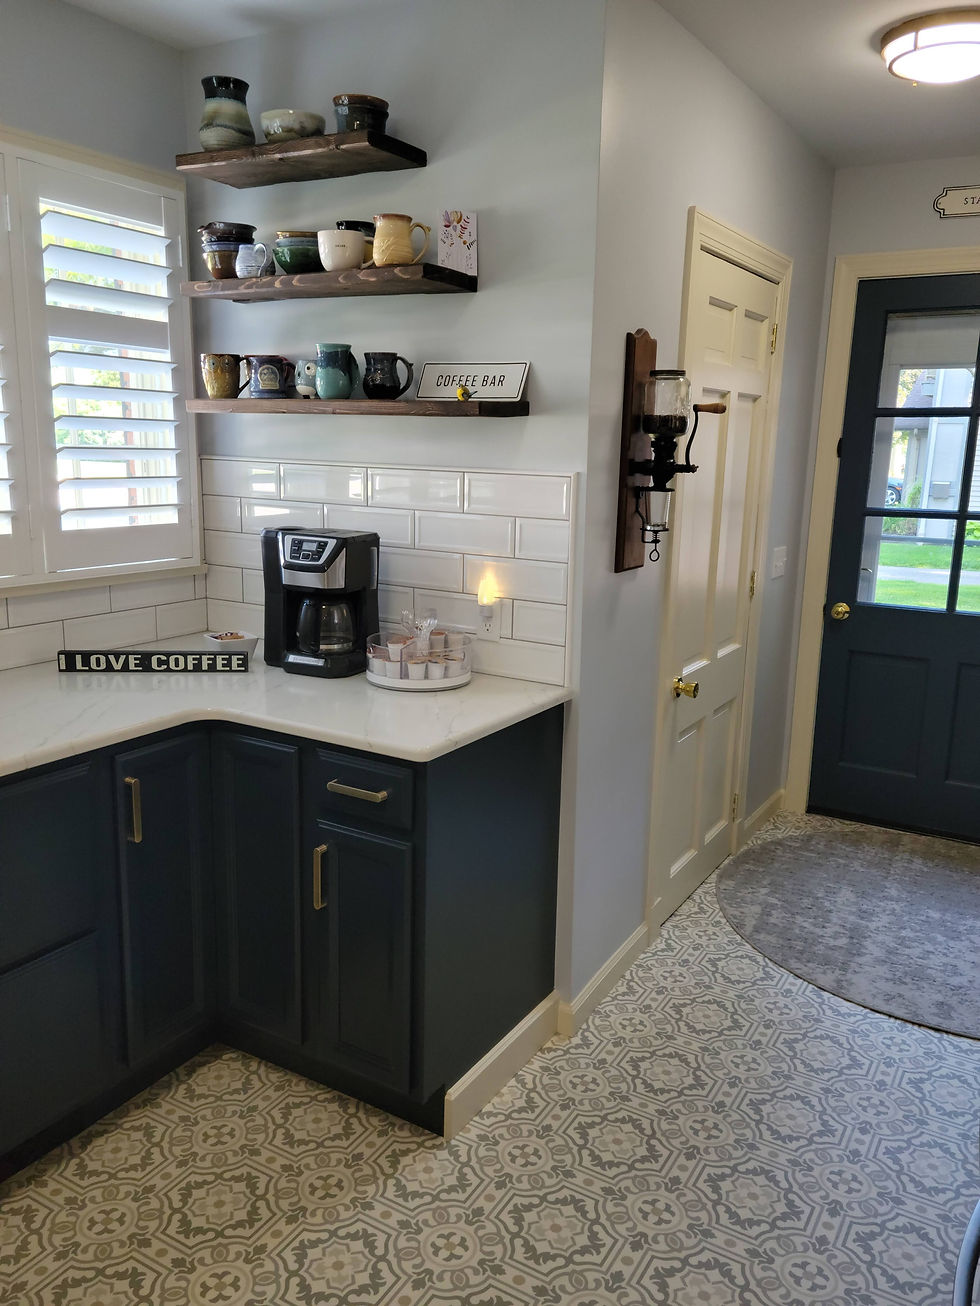
Next, let's take a closer look at the coffee bar and pantry! I love the artistry of pottery, so I've been picking up things on my travels for years. This seems like the perfect place to display them, with some space to add to the collection.
The pantry door is one of the doors that was originally in the laundry room, and we painted it to match the lighter cabinets. The entry door is original and was painted to match the front door and navy cabinets.
We decided on plantation shutters because we needed something to reduce the late-afternoon glare that made it difficult to be in the kitchen. We didn't want anything difficult to keep clean. Rockwood Shutters sent someone to my house for a consultation and measurements, then professionally installed them.
The inside of the pantry has four shelves on three walls. The top shelf is low enough that it can handle small appliances. The bottom shelf is high enough to accommodate taller items on the floor. We chose a very bright light and mounted it above the door.


Here is the view from the kitchen into the den! (See my next post for details about the den.) I didn't have enough wall space for the planned double ovens, so we added a second oven in the island. Both ovens are convection and one also works as an air fryer! Yay! The island also contains a double trash can in the center and a microwave on the right.

Looking into the dining room, you can see all the way through the entry hall and into the living room. The dining room has navy blue chairs and the living room curtains are blue. (This photo was taken while we were still in progress.)

Here's a photo of the transition from the kitchen to the den. The door to the right leads to the garage. The cream-colored strip in the middle with our family scheduling center is the side of the refrigerator cabinet. You can see a sliver of the exterior door on the left of the refrigerator.

I have been asked several times how I did this project. The answer is with a measuring tape, pencil, graph paper, and a whole lot of erasing. There were definitely some hiccups along the way and a few sleepless nights trying to figure it all out. I scoured books on kitchen design and Pinterest, then asked for advice. My contractor, Steve Graber, was a big help in guiding me through some of the more challenging aspects. I also had a lot of help from my assistant, Caylin Benson. I don't know how I could have done this project while being a present wife and mother without her. She and I did most of the painting ourselves, and when I got completely burned out, she took that part over.
One thing I decided very early on was this: if I don't LOVE it, it's not going in this house. I'd rather have a blank wall or mismatched furniture than to put anything in here just to have something in that space. I'd rather wait to find something wonderful that I can afford too. I'm glad I made that decision. Every day I look around this house and smile. What a privilege to be able to use my creativity in a way that lights me up inside. One of these days we'll sell this house, but for today I'm going to thoroughly enjoy living here.
If you like this renovation, drop a comment below! Click on that little red heart. Also, save this Pin and share this post on your social media pages. Sharing is caring, my friends!

Click on this picture to save this post to Pinterest!
Contractor: Graber Custom Renovations, Steve Graber
Plumbing and HVAC: Sterling Plumbing, Greg Wyse
Electrical: Woolace Electric, Eric Woolace
Counters: Black Swamp Cabinets, Pete Grieser
Backsplash: Mark Lemley
Kitchen Flooring: King's Flooring and Furniture, Defiance, OH
Additional Painting: Mark Peterson
Plantation Shutters: Rockwood Shutters/Home Depot
To read the next renovation post, click here.


